There are more than a dozen ways to brew coffee, all variations on immersion or filtration. This guide breaks down the physics of coffee brewing, the essential elements of a good cup of coffee, and a dozen different devices you can use to get your morning fix, with the pro’s and con’s of each method. There’s a brewing method for every mood and every occasion.
The Science of Coffee Brewing
Coffee is a solution. I know some people think coffee is THE SOLUTION, but I’m referring to chemistry. Technically, coffee is a suspension of coffee solids (solutes) in water (solvent). I promise not to get too bogged down in science terms, but a little scientific knowledge goes a long way in understanding why certain factors like temperature, water quality, and brewing method can combine in different ways to produce different results from the same two ingredients – coffee grounds and water.
Extraction Rate
Extraction rate means the percentage of solids transferred from the coffee grounds to the water. A high extraction rate will result in a very strong tasting cup of coffee. Taken to its extreme, a high extraction rate will leave you with a bitter, highly acidic and harsh tasting result. A low extraction rate will taste thin and watered down. Taken to its extreme, a low extraction rate will be indistinguishable from plain water.
Start with Good Water
Remember that even at the highest levels of extraction, coffee is around 98% water. Water is the main ingredient in your coffee, not coffee grounds. So the quality of water you use is important. Water that has a hard, soft, or rusty taste will not produce a satisfying cup of coffee.
You probably shouldn’t use pure, distilled water to make coffee either. Even if you wanted to do that, it would be extremely expensive. But more importantly, some level of impurities in the water is helpful.
The Specialty Coffee Association of America recommends using water with small levels of sodium, calcium, and other dissolved solids in it (complete specs here). In general though, if your water tastes good as water, it will taste good as coffee. If it doesn’t taste good, look into filters to help improve the water quality and therefore the coffee quality.
Use Enough Coffee
Back in the dark ages, when freeze dried coffee and electric drip coffee makers ruled the landscape, coffee companies convinced people that their brand required less coffee than their competitors. This bit of subterfuge made its way into the subconscious of the adult population, with the result that most people use less coffee grounds than they should per cup.
No amount of good roasting, custom grinding, or premium coffee machine can overcome a lack of grounds. As a rule, use 2 tablespoons of coffee grounds for each 8 ounce cup of coffee. If your coffee maker comes with a scoop, check your scoop. I doubt it’s the right size. Most coffee maker scoops are 1 tablespoon. Using a measuring spoon is even better.
If you use two tablespoons and the coffee tastes too strong, experiment with other brewing methods before diluting the grounds to water ratio. If you just can’t stand to use that much coffee, well, that’s your business. After all, there are no coffee police to come tell you how to live your life. I’m just telling you what I’ve found works the best.
Use the Right Grind
Different brewing methods call for different levels of grind. A fine grind is going to increase the surface area of grounds that comes in contact with the water, resulting in more extraction with less time or effort. Of course, it will also result in the need for a finer filter to screen out the grounds before drinking. That’s why methods like the French press, which has a wire mesh screen use a coarse grind, while automatic drip machines use a finer grind and a finer filter.
Most coffee shops will grind whole beans for you to your desired level of coarseness. Remember though, that ground coffee quickly loses it flavor. Therefore the best way to ensure freshness is to grind your own beans right before you brew your coffee.
There are two main types of grinders for home use – blade grinders and burr grinders. Blade grinders use a metal blade spinning at high speeds to chop up coffee beans. Blade grinders are cheaper and smaller than burr grinders. Blade grinders can also serve a dual role as a spice grinder (though you should make sure the grinding chamber is clean to avoid cross-contamination).
Although burr grinders take up more room and cost more, they produce a much more controlled and consistent grind. In a burr grinder, metal gears called burrs rub together like cogs in gear wheels to crush the coffee beans. You can control the space between the burrs to change from coarse to fine levels of grind.
Picking the Right Brewer
Trying to decide which coffee brewer to use can be confusing, but asking yourself a few basic questions can simplify the process.
Ask yourself if you prefer a full-bodied cup of coffee or something lighter. French presses, moka pots, and ibriks will all give you a full-bodied cup, while drip brewers and vacuum pots produce a lighter brew.
Next ask yourself if you want a set-it-and-forget it approach or desire a more hands-on method. Some brewing machines are all about convenience. Others are all about the ritual of making coffee. Automatic drip brewers and automatic vacuum pots are simple. A manual drip or ibrik is very hands-on. A flip drip device is hands-on with a theatrical flair.
Whatever your preference, there’s a brewing solution for everyone.
Percolator
Percolators are evil. That’s the perspective of most coffee purists. That’s because percolators commit the one unforgivable sin of coffee brewing – they boil the coffee. Percolators force boiling water up a tube in the center of the pot. The boiling water then spills over the coffee grounds, which are in a small metal chamber at the top of the tube. So far, so good. But the resulting solution is weak and drips down to the bottom of the percolator where the process is repeated over and over again. This causes most of the aromatics in the coffee grounds to be burned off. The final result is a very harsh and overextracted solution.
If perked coffee is so bad, why do I include it? Probably because of nostalgia. I associate percolators with camping, one of my favorite hobbies. I have fond memories of cooking breakfast on a campfire beside a crystal-clear lake. The scenery was always breath-taking, the coffee – not so much.
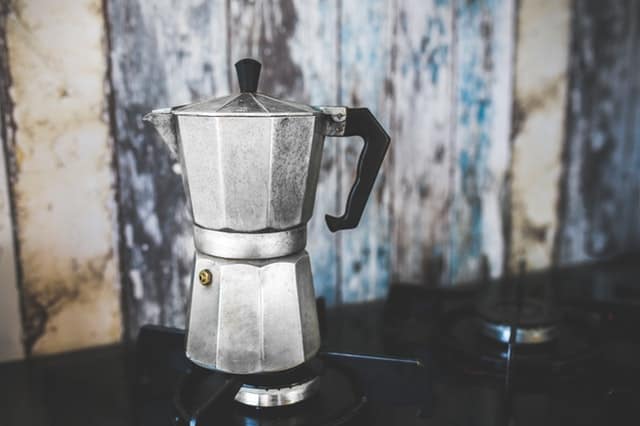
Moka Pot
The moka pot was invented in Italy in the 1930s and named after Mocha, a port city in Yemen which was a major coffee hub for hundreds of years.
A moka pot uses a mechanism similar to the percolator with two important differences. First, the moka pot has two chambers, an upper and lower. This keeps the coffee from reboiling. Second, the moka pot uses steam pressure to force water up through the coffee grounds. This results in a higher extraction rate than a percolator and a much thicker cup of coffee.
Using a moka pot requires finely ground coffee and a stovetop, although there are electric versions as well. Add water to the lower chamber, add grounds to the middle portion, then screw the whole thing together and place on the stove over medium heat.
I recommend getting a stainless steel moka pot rather than an aluminum one. Stainless steel models cost more, but produce a better result. The Bialetti company designed the original moka pot and their models are still the standard for quality.
Ibrik
This brewing device goes by different names in different countries. It’s called a cezve in Turkey and a briki in Greece. Americans know it as an ibrik, and the product is known as Turkish coffee (or Greek coffee).
To operate an ibrik, you need extremely fine ground coffee because there’s no strainer. Grounds for ibriks are even finer than espresso settings. You add the grounds and sugar to cold water and heat it up over medium heat (you can also add cardamom if desired). As the water simmers, the coffee solids dissolve. Remove from heat once the coffee starts to froth and pour the froth into a cup. Place the ibrik back on the heat and simmer until just before boiling before pouring into a cup.
Ibriks don’t produce a lot of coffee, usually a demitasse portion. But the coffee is strong, thick, and sweet. Leave the last sip because it will be full of sludgy grounds.
French Press
French Press is just a fancy name for a manual brewer. A French press resembles a tall glass pitcher with a metal mesh screen. You operate it by adding coarsely ground coffee and hot water. Steep the grounds for about four minutes, then slowly press the plunger down to separate the grounds from the brew and pour.
French press coffee has a heavier body than other methods and produces strong cups of coffee. It’s best move the coffee to a thermal carafe after brewing. Otherwise, the coffee will continue to steep and begin to get bitter.
AeroPress
The AeroPress was invented in 2005 by Alan Adler. It functions much like a single serving French press but with a few key differences. The AeroPress uses a fine paper filter instead of a metal mesh screen so there’s less sediment in your cup. The AeroPress also uses a plunger to push the water through the grounds, resulting in a faster brew than a French press.
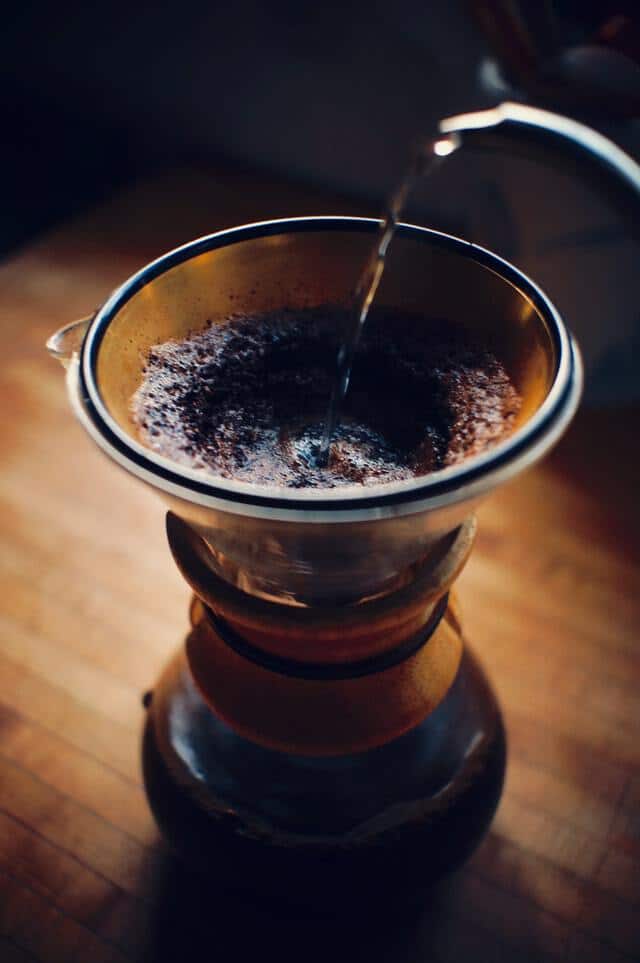
Manual Drip
Manual drip brewing is also known as the pour-over method. In manual drip brewing, water is poured over coffee grounds which are held in a filter. Most of the time, the filter is cone shaped which provides a deep bed of grounds to maximize extraction. One well-known example of a manual brewer is the Chemex. Another is the Vietnamese phin. Manual brewers are simple to use, but do require your presence.
For the best results, pour a little bit of water on the grounds to thoroughly wet them. Wait about 30 seconds, then add the rest of the water. Depending on the size of the brewer, you may have to add water several times. Manual brewer produces a lighter body than a French press because the filter traps oils and solids from the grounds.
Pour-over users debate whether metal or paper filters are best. Metal filters are reusable and work best with a coarser grind than paper. Personally, I use a manual drip Brewer with a metal filter almost every morning.
Electric Drip
Electric drip brewers are the most common type of coffee brewer in America. Using the same principles as a manual pour-over, electric brewers heat the water before pouring it over coffee coffee grounds in the filter automatically. This allows you to turn the coffee maker and walk away, coming back once it’s finished. Some of models even include a timer so you can add all the materials the night before and have it start at a preset time.
What you gain in convenience with an automatic brewer, you lose in quality. Coffee grounds lose their flavor quickly after grinding, meaning using a preset timer and beans ground the night before will inevitably result in a less flavorful cup. Furthermore, automatic coffee makers typically have a hotplate to keep the coffee warm. This usually results in a burnt taste.
Neapolitan Flip Drip
The flip drip coffee pot is usually known as a Neapolitan coffee pot. This manual drip brewer is similar to a moka pot in that it has two chambers, upper and lower, and requires a stove. Neapolitan flip pots are usually made of the same materials as moka pots, and I recommend finding one made out of stainless steel instead of aluminum. Unlike a mocha pot, however, the Neapolitan flip pot uses gravity to brew instead of steam pressure.
To use a flip pot, fill the bottom section with water, the middle section with fine ground coffee, and place the upper pot on top. Set the whole contraption on the stove to boil. Once the water is boiling, simply flip the coffee maker over and let the water filter through the grounds. You can control the strength of the coffee by controlling by changing the level of grind I find grind will taste stronger than a coarse grind.
Vacuum Pot
Vacuum pots, also known as siphons, are immersion brewers which resemble a chemistry set. Invented in Germany in the 1830s, vacuum pots use vapor pressure like moka pots to push water through coffee grounds. Unlike moka pots, however, the resulting coffee in a vacuum pot drains back into the bottom chamber.
Vacuum pots use an open flame and require a little bit of patience and practice to use, but the resulting coffee is clean and bright without sediment.
Pod Brewers
Single serving brewers have become popular in recent years. Keurig is probably the most well-known brand for these devices. In these devices, the coffee grounds and filter are combined in a single-use “pod.” Single serving brewers heat water like automatic drip machines and use pressure to force the water through coffee grounds quickly. This results in a satisfying cup of coffee.
There are two main downside to these brewers. First, the single-use pods generate a lot of waste. Second, the coffee is ground and pre-packaged in the pods. This all but guarantees your coffee grounds are more stale than they would be if you ground your own beans.
Cold Brew
Cold brew is not iced coffee. I feel like that distinction needs to be made up front. Iced coffee is brewed hot and then cooled before serving. Cold brew coffee, on the other hand, is made by steeping coffee grounds in cold water for several hours.
To make cold brew coffee, put coarse ground coffee and room temperature water in a French press and let it steep for 6-8 hours. Strain the resulting concentrate and mix with equal parts cold water or milk.
Cold brew coffee uses twice as much water as hot coffee so it has a very smooth taste. It’s easy to make in advance and store in the fridge for 1-2 days.
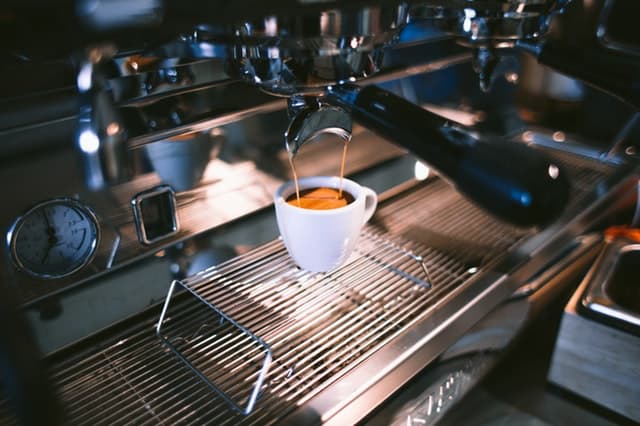
Espresso
Espresso is a whole ‘nother level of coffee, requiring significant investment in equipment and practice. Espresso is made from forcing hot water through densely-packed, finely-ground coffee.
Espresso is thicker than other brewing methods and has a thin, creamy foam on top known as a crema. Espresso also has a higher concentration of caffeine than other methods, but this is offset by the fact that the serving size is much smaller (1 ounce).